
Call Tracking API Documentation for CallGauge AI
Use the CallGauge AI call tracking API to securely access call records, tracking numbers, campaigns, voicemails, messages and reports. Generate API keys, authenticate REST requests and connect CallGauge AI data with your own applications, dashboards and workflows.
The CallGauge AI REST API gives developers secure programmatic access to call tracking and marketing attribution data. Use API keys generated from the Dev Portal to retrieve call records, voicemails, tracking numbers, campaigns, messages and reports for your own applications, dashboards, reporting systems and automated workflows.
Secure Authentication
Authenticate every request using a secure API key generated from your CallGauge AI Dev Portal.
Call Tracking API Resources
Access supported resources including Calls, Voicemails, Numbers, Campaigns, Messages and Reports.
https://app.callgauge.ai/api/v1Getting Started
Create an API key from the Dev Portal, enable the resources your application needs and include your API key in the Authorization header of every request.
1Getting Started
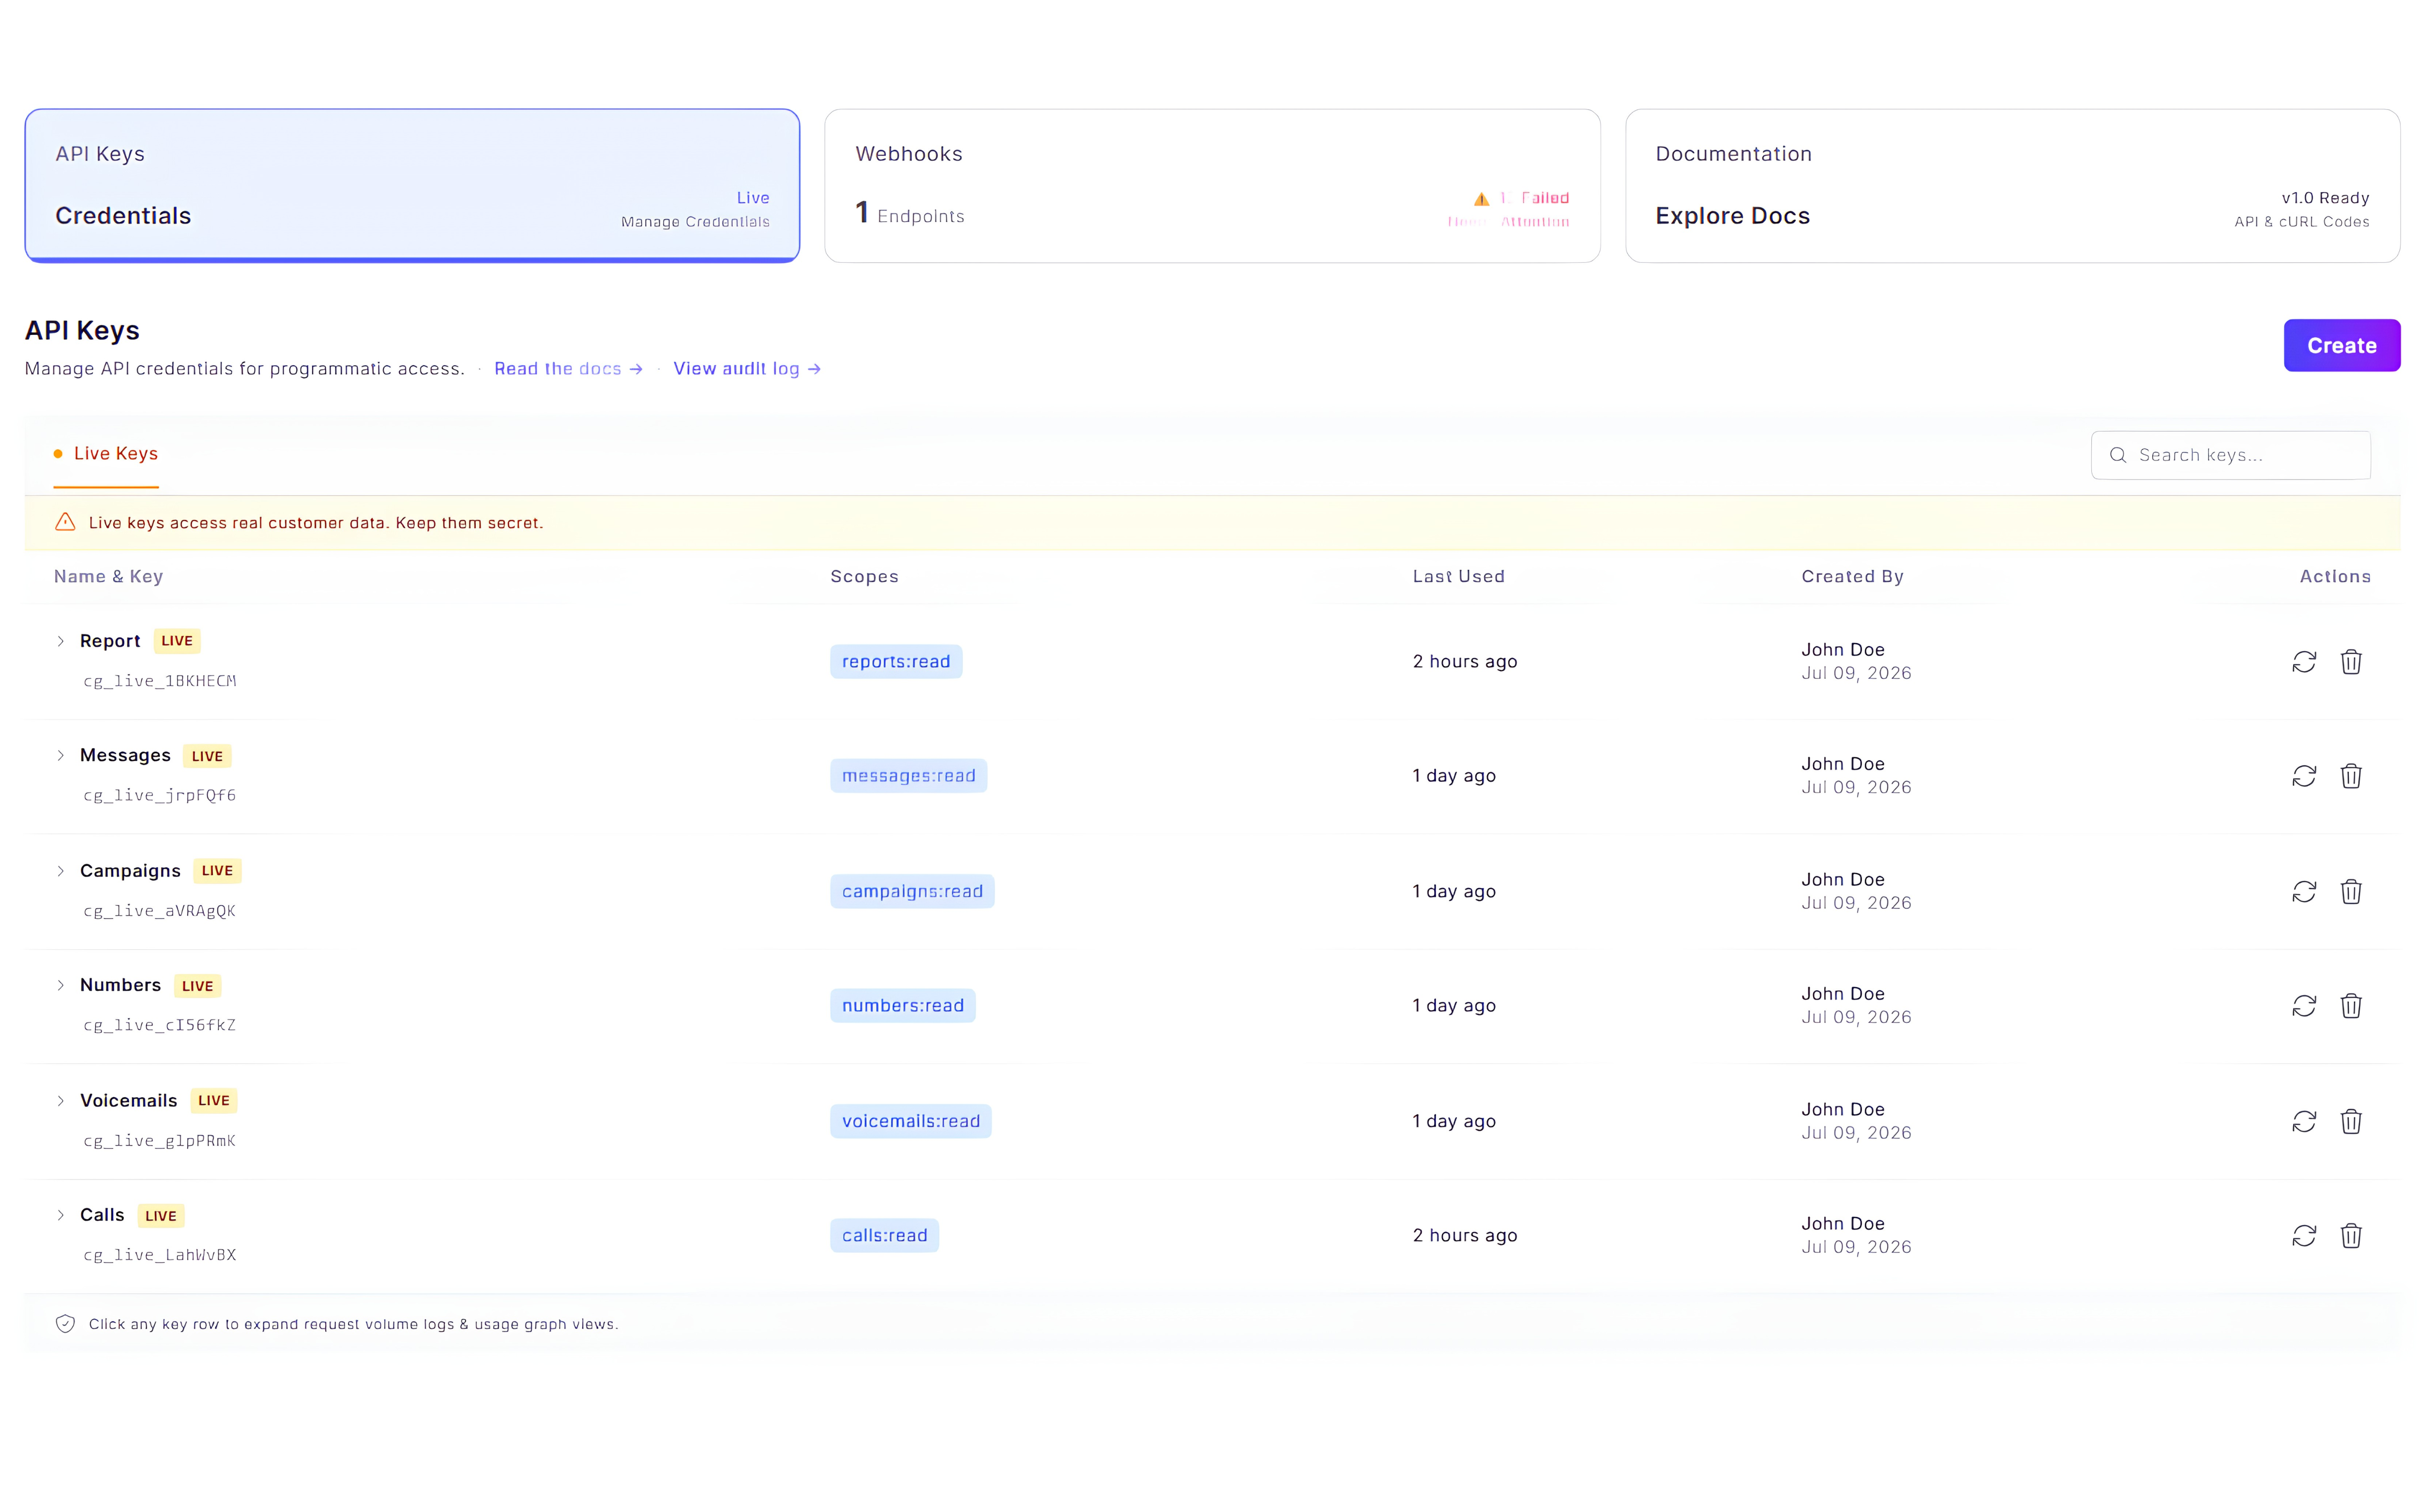
Use the Dev Portal in your CallGauge AI dashboard to create API credentials, review API usage and manage access to supported resources. Before making your first request, create an API key with the permissions required by your application.
- Open the Dev Portal from your CallGauge AI dashboard.
- Select the API Keys section.
- Click the Create button.
- Enter a name for the key and select the resources your application needs.
- Create the key and securely copy the generated credential.
Review API Usage
Monitor requests, success rate, recent API activity and daily usage from the Dev Portal.
Manage API Keys
Create credentials with access limited to the resources required by each integration.
Review Webhooks
View webhook endpoints and identify failed deliveries that may require attention.
Dev Portal Access
The Dev Portal provides a central place to manage API credentials, monitor request usage, access documentation and review webhook activity.
2Create and Manage API Keys
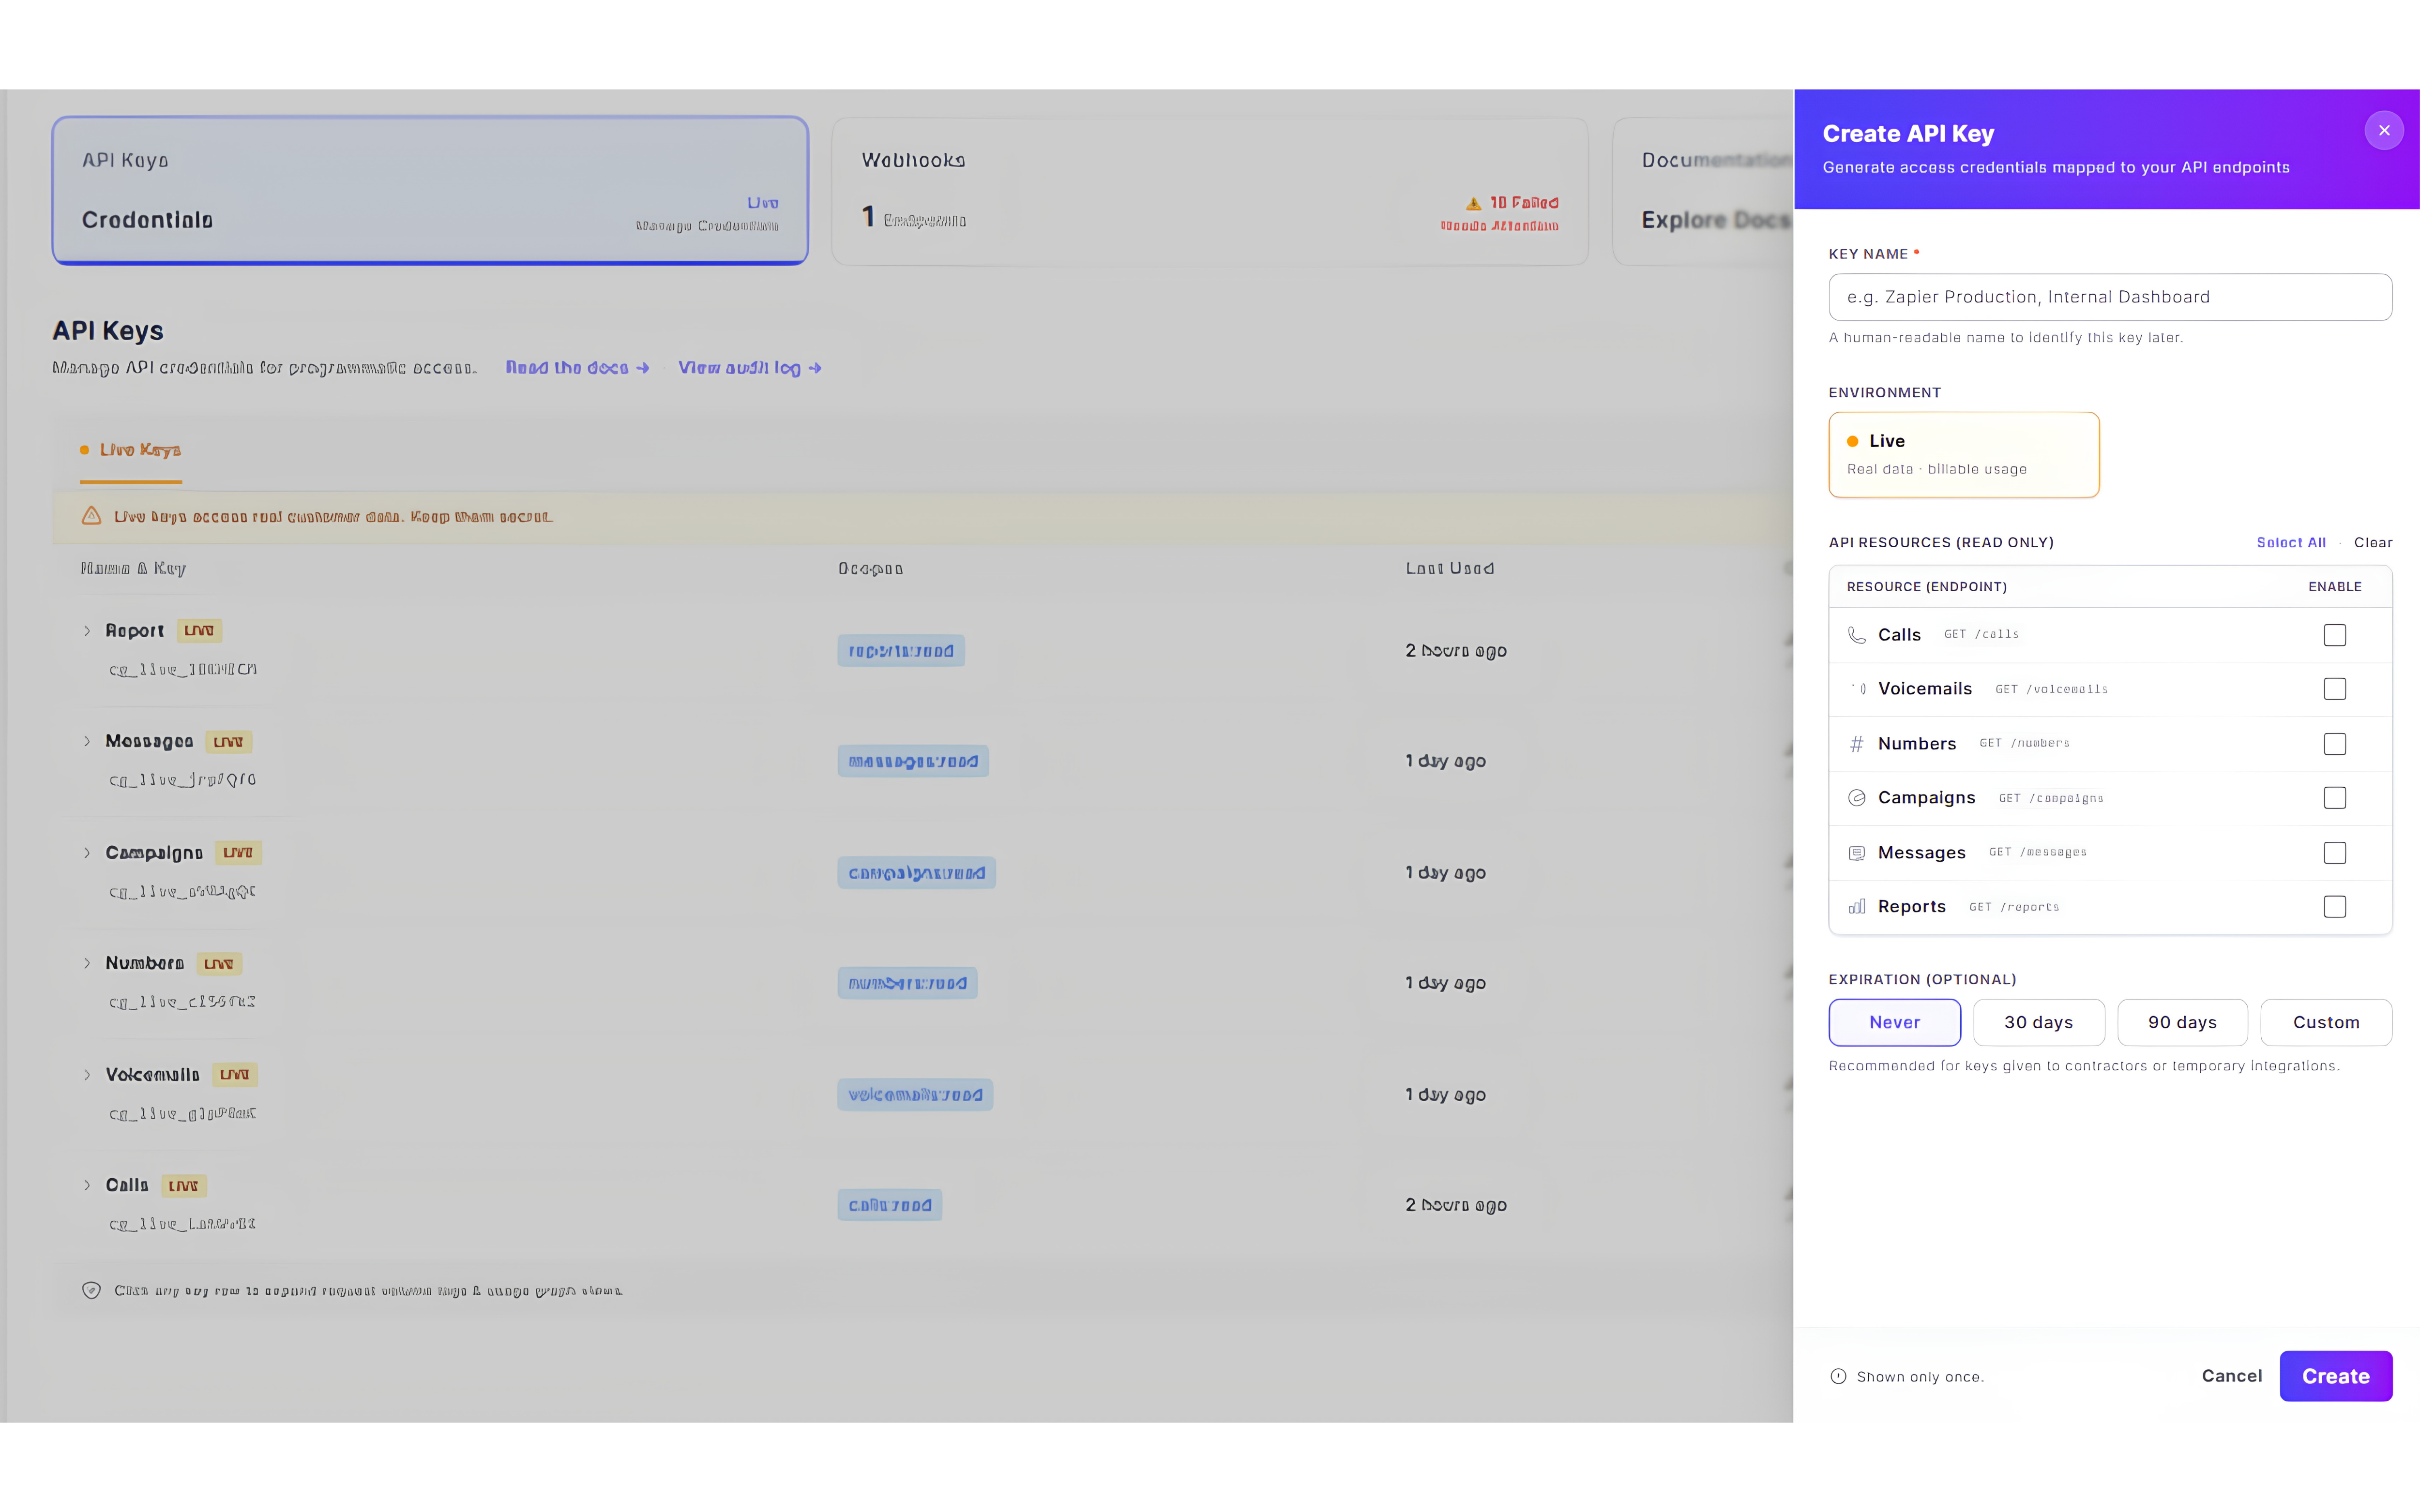
API keys provide secure programmatic access to CallGauge AI resources. Each key can be assigned a descriptive name, specific read-only resource permissions and an optional expiration period.
Key Name
Add a clear name such as “Internal Dashboard” or “Zapier Production” so you can identify the key later.
Environment
Live keys provide access to real customer data and may generate billable API usage.
Resource Permissions
Enable only the read-only resources required by the application using the key.
Expiration
Choose no expiration, 30 days, 90 days or a custom expiration period.
Available read-only resources
calls:readvoicemails:readnumbers:readcampaigns:readmessages:readreports:readCopy and Store Your Key Securely
The complete API key is shown only once after creation. Copy it immediately and store it in a secure secrets manager or environment variable. Never expose a live API key in frontend code.
3Authentication
Include your API key as a Bearer token in the Authorization header of every request. The key must have permission to access the requested resource.
Authorization: Bearer YOUR_API_KEY
curl -X GET "https://app.callgauge.ai/api/v1/calls" \
  -H "Authorization: Bearer YOUR_API_KEY" \
  -H "Accept: application/json"
Permission Required
A request can only access resources enabled when the API key was created. For example, the Calls endpoint requires the calls:read scope.
Use HTTPS
Send all API requests over HTTPS and keep credentials on a secure server. Do not place API keys in browser-side JavaScript.
Protect Your Credentials
Treat API keys like passwords. Revoke or rotate a key immediately if it is accidentally exposed or is no longer required.
4Call Tracking API Resources
When creating an API key, select the resources your application needs to access. CallGauge AI currently provides read-only access to Calls, Voicemails, Numbers, Campaigns, Messages and Reports.
/callscalls:read/voicemailsvoicemails:read/numbersnumbers:read/campaignscampaigns:read/messagesmessages:read/reportsreports:readRead-Only Access
The available API resources currently use read-only permissions, allowing your application to retrieve supported CallGauge AI data.
Scope-Based Permissions
Each API key can only access the resources that were enabled when the key was created.
Use the Minimum Required Access
Only enable the resources required by your integration. For example, an application that only retrieves call records should use the calls:read scope.
5Call Tracking API Request Example
The following example shows how to send an authenticated request to the Calls resource. Replace YOUR_API_KEY with the live API key generated from your Dev Portal.
https://app.callgauge.ai/api/v1/callscalls:readcurl -X GET "https://app.callgauge.ai/api/v1/calls" \
-H "Authorization: Bearer YOUR_API_KEY" \
-H "Accept: application/json"Request requirements
Valid API Key
Include an active API key in the Authorization header.
Required Scope
The API key must include permission for the requested resource.
Secure Connection
Send requests over HTTPS to protect credentials and returned data.
JSON Response
Use the Accept header to request a JSON-formatted response.
Never Share a Live API Key
Do not include a real API key in documentation, screenshots, source control or browser-side code. Use environment variables or a secure secrets manager.
6Response Format
Successful API requests return data in JSON format. The exact properties included in the response depend on the resource being requested and the data available in your CallGauge AI workspace.
{
  "success": true,
  "data": [
    {
      "id": "resource_id",
      "created_at": "2026-07-20T10:30:00Z"
    }
  ]
}
Illustrative Response
The example above demonstrates the general JSON format only. Review the documentation for each resource to confirm the properties returned by that endpoint.
Working with responses
Check the Status Code
Review the HTTP status code before processing the response body. Successful requests normally return a status in the 200 range.
Handle Missing Values
Some properties may be empty or unavailable depending on the resource, call activity or workspace configuration.
Parse JSON Safely
Validate the response before using returned values in your application or automated workflow.
Log Request Errors
Record failed requests and returned error details to make integration problems easier to diagnose.
7Error Codes
CallGauge AI uses standard HTTP status codes to indicate whether an API request was successful. When a request fails, review the returned status code and error details before retrying it.
400Bad RequestThe request contains invalid parameters, missing values or unsupported data.
401UnauthorizedThe API key is missing, invalid, expired or incorrectly formatted.
403ForbiddenThe API key does not have permission to access the requested resource.
404Not FoundThe requested endpoint or resource could not be found.
429Too Many RequestsThe API request limit has been reached. Wait before sending more requests.
500Internal Server ErrorAn unexpected server error occurred while processing the request.
{
  "success": false,
  "error": {
    "code": "unauthorized",
    "message": "A valid API key is required."
  }
}
Review the Request Before Retrying
Check the endpoint, API key, required scope and request format before sending the request again. Avoid repeatedly retrying invalid requests.
8Rate Limits
API requests are subject to usage limits that help protect service reliability and prevent excessive traffic. You can review your current API usage and daily request allowance from the Dev Portal.
API Usage
Review total requests, successful requests, failed requests and recent activity from your Dev Portal.
Daily Request Allowance
Monitor how many requests have been used and how many remain within the current daily usage period.
Limit Reached
Requests sent after the active limit is reached may return a 429 Too Many Requests response.
Retry Carefully
Use controlled retry logic and avoid sending repeated requests in a short period when the limit has been reached.
Reduce Unnecessary Requests
Cache data where appropriate, request only the resources you need and avoid repeatedly retrieving unchanged information.
9Call Tracking API Webhooks
Webhooks allow CallGauge AI to send event data to an external endpoint when supported activity occurs. Use the Webhooks section in the Dev Portal to review endpoints, monitor deliveries and identify failed events.
Webhook Endpoint
Configure a secure HTTPS URL that can receive supported CallGauge AI event payloads.
Event Deliveries
Review recent webhook deliveries and confirm that your endpoint processed them successfully.
Failed Deliveries
Identify failed webhook attempts and review your endpoint response, availability and configuration.
Endpoint Security
Keep webhook endpoints private, validate incoming requests and avoid exposing sensitive event data.
Recommended webhook workflow
Create a secure HTTPS endpoint in your application.
Add and configure the endpoint from the Dev Portal.
Return a successful response after receiving an event.
Review delivery activity and troubleshoot failed events.
Webhook Availability
Available webhook events and payload properties depend on the features currently supported by your CallGauge AI account. Review the Dev Portal before implementing an event workflow.
10API Best Practices
Follow these recommendations to keep your CallGauge AI integration secure, reliable and easy to maintain.
Keep API Keys Secret
Store API keys in environment variables or a secure secrets manager. Never include live credentials in source control, screenshots or public documentation.
Use Least-Privilege Access
Enable only the resource permissions required by each integration. Avoid creating keys with unnecessary access.
Send Requests Over HTTPS
Use HTTPS for every API request and webhook endpoint to protect credentials and transmitted data.
Rotate Keys Regularly
Replace old or unused API keys and immediately revoke any credential that may have been exposed.
Keep Keys on the Server
Make authenticated requests from a secure backend. Do not expose API keys in browser-side JavaScript, mobile application bundles or public repositories.
Handle Retries Carefully
Retry temporary failures with controlled delays. Do not repeatedly resend invalid requests or rapidly retry after receiving a rate limit response.
Recommended security checklist
Store API keys in a protected server-side environment variable.
Create a separate API key for each application or integration.
Enable only the resource scopes required by that application.
Set an expiration date when permanent access is not required.
Monitor API usage and investigate unexpected request activity.
Revoke credentials that are no longer in use.
Revoke Exposed Credentials Immediately
If an API key appears in a public repository, frontend application, support message or shared screenshot, treat it as compromised. Revoke it from the Dev Portal and create a replacement key.
11Technical Support
Contact the CallGauge AI support team when you need help with API authentication, resource permissions, request failures, usage limits or webhook delivery issues.
Authentication Problems
Get help with invalid, expired or revoked API keys and Bearer token authentication.
Permission Issues
Confirm that an API key has the correct read-only resource permissions for the endpoint you are requesting.
Usage and Request Limits
Ask for assistance when your API usage appears incorrect or your integration repeatedly receives rate limit responses.
Webhook Delivery Issues
Get help diagnosing failed deliveries, endpoint configuration and webhook connectivity problems.
Contact Developer Support
Email our support team with details about the API request, returned status code and the issue you are experiencing.
Include Useful Diagnostic Details
Include the endpoint, HTTP method, response status code, request time and a description of the issue. Never send your complete API key, sensitive customer data or private webhook payloads by email.
Need Help With the CallGauge AI API?
Whether you're generating API keys, troubleshooting authentication, working with webhooks or building an integration, our team is here to help you get up and running.